maandag 26 september 2011

Driving or pushing the car?

I had the car out of the garage last weekend to test


the engine temperature and the electric cooling fan.


Somebody on the TR7 site was showing off with his garage


floor so therefore a few pictures of the work I’ve been


doing during the summer.


All was well just until the moment I wanted to start the


car to get it back in to the garage; no kick or movement


from the starter.


I was thinking about Beans ( http://tr7beans.blogspot.com/ )


last time; he spent so much time and effort on to his car


and then somebody almost crashed in to it and later on


during the 10 countries trip his gearbox breaks down;


how much bad luck can someone take?


But mine hasn’t even been on the road yet and already


I have to push it back in the garage; the wife’s confidence


in my technical skills is low at the moment even after my


excuses about old cars and especially TR’s.


Cutting the centre console.

A friend of mine has a tool to cut out a small part of the


centre console. It’s a tool doctors use to cut the plaster


from a broken leg or arm it doesn’t rotates but oscillates


so the plastic is cut and not melted.


He removed a part of the cutting blade this


way it can cut small corners also


and indeed it only took me a few minutes to get the radio
perfectly fitted a bonus with the oscillating tool is that
there isn’t any dust or plastic powder flying around.


The rear speakers are also installed and along with the

front speakers which are mounted in the doors they give

a very good sound although I think I will be enjoying

the sound of the engine most of the time.


vrijdag 23 september 2011

Installing the radio.

As there is not much room in the centre console it is


important to arrange all the electric wires as good as possible.


The housing for the radio fits perfect into the centre console.


Next step; cleaning the gear shift console en centre arm rest.


The radio itself is a little bit to large and won’t go deep


enough into the housing because the centre console is


to narrow this means it doesn’t make any contact so I


can’t test the radio yet; a well-known problem with this


car and ‘new’ radios.


I will deal with this problem as soon as I can get a


special tool to cut off some edges from the console.


Test fitting of the rear bulkhead panel.


donderdag 22 september 2011

Interior trim

With the electrics sorted out it was time to install
the interior trim.
I took the rear bulkead insulation pad out of the
shed and glued it back in to place.


The under felt carpet is glued into place and installing


a part of the carpet set was the next thing to do.


I got the radio out of the shed and prepared it for installation.


In the meanwhile I also found the time to test the


wiper motor and mechanism and all worked fine this


gave me the opportunity to install the wipers in the


correct position.


More cleaning.

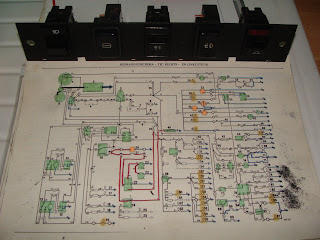
Took all the switches apart but forgot to take


some pictures they were very badly corroded


and were covered with a thick blue-green layer of corrosion.


everything cleaned and put toghether again.


More dirty connections and switches.


After cleaning..


Electric switches.

I took every switch apart to give it a good clean

along with a light protection spray.


No indicators, no pop up lights with high beam flash,


no rear window heating, and no brake lights as a matter


effect nothing was really working


but after cleaning everything worked as new.


Not such a big work and sure worth the effort.


New electric connectors.

Luckily I managed to get the car waterproof in time


because a day later it started to rain, again.


There was also a lot of work to do on the electrics;


almost none of the electric parts were working mostly due


to corroded switches and also to a few bad connectors.


So I replaced some of the connectors at the front lights


with a ‘newer’ model (recuperated from a donor car)


Door mirrors.

Luckily it didn’t rain that day because I still had to fix
the rear quarter grills and door mirrors and boot lock
to make the car waterproof.


The new ‘T’ bolts for the quarter grill I’ve ordered at


Rimmer didn’t match the nuts that came along with them,


after contacting RimmerI knew I had to cut the ‘T’ bolts


by 4mm to match the nuts, another problem sorted out.


Fixing the door mirrors was just a small job and once

this was done I could install the door cards.


When I tried to install the rear boot lock I saw that a small


part of the mechanism was broken so I had to order a new one.


Searching on the site of Rimmer showed me that there were


new door cards for sale.


A few years ago I had black-green door cards and


black-green seats but stupidly enough I throw them away


because at that moment I still had a red car in mind and I was


in lack of space to put them aside.


At least I’ve learned something; never throw anything away


that’s got something to do with a 7.


Window rubber/felt.

After the installation of the door hinges (this went quiet easy)


it was time to install the quarter window and the window


rubber/felt ‘glass run’.


Now that these parts where installed the car was ready


to go outside the garage to resist the rain that we had during


this ‘nice’ summer and work on the garage could continue.


Installing the door hinges.

I had a bit of a struggle replacing the grommets but with

the help of a little oil the grommet finally went in to his lodgment.


Then it was time to install the hinges back into the doors.


To avoid doing the job twice to undo mistakes I took


the book to see the correct order to put everything back into place.


And the final result, perhaps I need to color the gasket...


Parts powder coated

Again it has been a long time since I updated this blog but I

had some good reasons for it; the last thing to do on the house


was finishing the garage and the garage is where the 7 spends


her nights (and for the moment also the days) so a nice room for


an almost finished car is more than welcome.


In the mean time I’ve send some parts to a company to get them


sandblasted and metalized and powder coated.


This was just before the company closed for holiday so I had


to wait a while before I got the parts back but the result was


worth waiting for.


In the rare moments that I wasn’t working on the garage I’ve


spent my time to reassemble the door hinges.